Deploying a serverless crawler with python + lambda
March 18, 2019
⏳ 5 min read
What I’m gonna build
I’m gonna build a simple crawler that will send HTTP request to zigbang.com’s api server to receive data on estates, and then save it to dynamoDB.
Prerequisites
- Have a recent version of node installed
nvm install stable- Install
serverlessglobally
npm install -g serverlessInitialize serverless project
To initialize it with a python template,
serverless create --template aws-python3see more templates from the documentation.
Then you are gonna see something like
Serverless: Generating boilerplate...
 _______                             __
|   _   .-----.----.--.--.-----.----|  .-----.-----.-----.
|   |___|  -__|   _|  |  |  -__|   _|  |  -__|__ --|__ --|
|____   |_____|__|  \___/|_____|__| |__|_____|_____|_____|
|   |   |             The Serverless Application Framework
|       |                           serverless.com, v1.39.0
 -------'

Serverless: Successfully generated boilerplate for template: "aws-python3"
Serverless: NOTE: Please update the "service" property in serverless.yml with your service name
Successful!
Give permission to serverless cli on aws
AWS Access keys
You need to create something called AWS Access Keys.
- Head over to Identity and Access Management home
- Browse to Users tab and click add user.
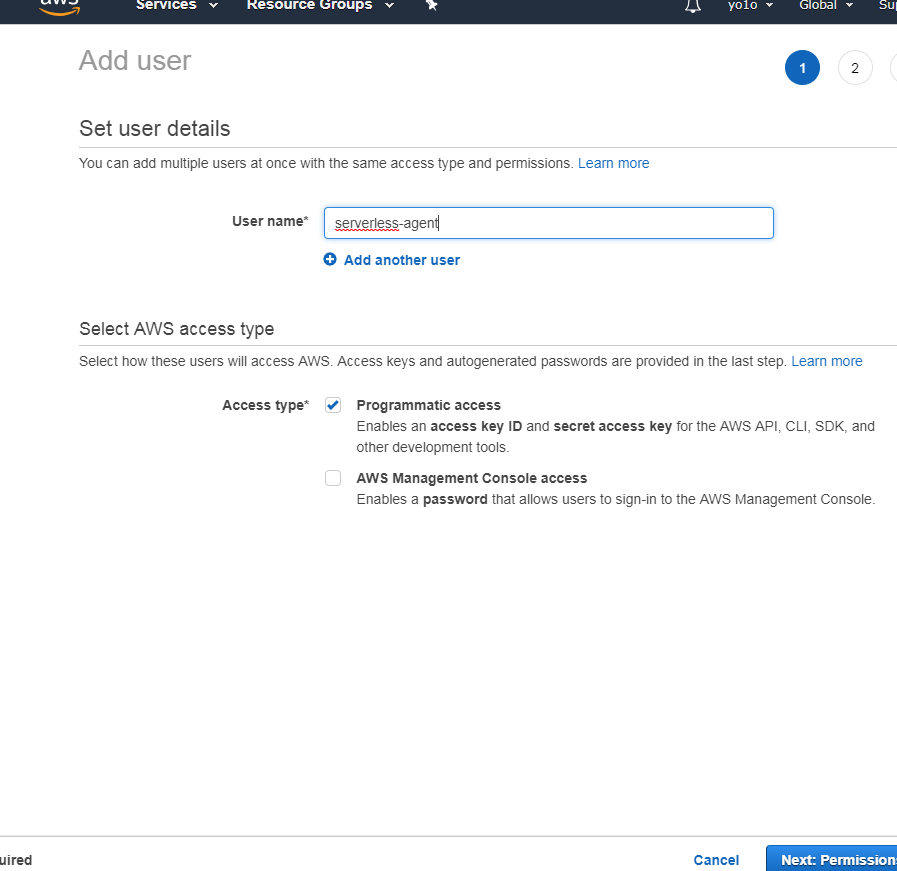 3. Click on Attach existing policies directly and Create policy.
Add the following json provided by
3. Click on Attach existing policies directly and Create policy.
Add the following json provided by serverless team:
{
  "Statement": [
      {
          "Action": [
              "apigateway:*",
              "cloudformation:CancelUpdateStack",
              "cloudformation:ContinueUpdateRollback",
              "cloudformation:CreateChangeSet",
              "cloudformation:CreateStack",
              "cloudformation:CreateUploadBucket",
              "cloudformation:DeleteStack",
              "cloudformation:Describe*",
              "cloudformation:EstimateTemplateCost",
              "cloudformation:ExecuteChangeSet",
              "cloudformation:Get*",
              "cloudformation:List*",
              "cloudformation:PreviewStackUpdate",
              "cloudformation:UpdateStack",
              "cloudformation:UpdateTerminationProtection",
              "cloudformation:ValidateTemplate",
              "dynamodb:CreateTable",
              "dynamodb:DeleteTable",
              "dynamodb:DescribeTable",
              "ec2:AttachInternetGateway",
              "ec2:AuthorizeSecurityGroupIngress",
              "ec2:CreateInternetGateway",
              "ec2:CreateNetworkAcl",
              "ec2:CreateNetworkAclEntry",
              "ec2:CreateRouteTable",
              "ec2:CreateSecurityGroup",
              "ec2:CreateSubnet",
              "ec2:CreateTags",
              "ec2:CreateVpc",
              "ec2:DeleteInternetGateway",
              "ec2:DeleteNetworkAcl",
              "ec2:DeleteNetworkAclEntry",
              "ec2:DeleteRouteTable",
              "ec2:DeleteSecurityGroup",
              "ec2:DeleteSubnet",
              "ec2:DeleteVpc",
              "ec2:Describe*",
              "ec2:DetachInternetGateway",
              "ec2:ModifyVpcAttribute",
              "events:DeleteRule",
              "events:DescribeRule",
              "events:ListRuleNamesByTarget",
              "events:ListRules",
              "events:ListTargetsByRule",
              "events:PutRule",
              "events:PutTargets",
              "events:RemoveTargets",
              "iam:CreateRole",
              "iam:DeleteRole",
              "iam:DeleteRolePolicy",
              "iam:GetRole",
              "iam:PassRole",
              "iam:PutRolePolicy",
              "iot:CreateTopicRule",
              "iot:DeleteTopicRule",
              "iot:DisableTopicRule",
              "iot:EnableTopicRule",
              "iot:ReplaceTopicRule",
              "kinesis:CreateStream",
              "kinesis:DeleteStream",
              "kinesis:DescribeStream",
              "lambda:*",
              "logs:CreateLogGroup",
              "logs:DeleteLogGroup",
              "logs:DescribeLogGroups",
              "logs:DescribeLogStreams",
              "logs:FilterLogEvents",
              "logs:GetLogEvents",
              "s3:CreateBucket",
              "s3:DeleteBucket",
              "s3:DeleteBucketPolicy",
              "s3:DeleteObject",
              "s3:DeleteObjectVersion",
              "s3:GetObject",
              "s3:GetObjectVersion",
              "s3:ListAllMyBuckets",
              "s3:ListBucket",
              "s3:PutBucketNotification",
              "s3:PutBucketPolicy",
              "s3:PutBucketTagging",
              "s3:PutBucketWebsite",
              "s3:PutEncryptionConfiguration",
              "s3:PutObject",
              "sns:CreateTopic",
              "sns:DeleteTopic",
              "sns:GetSubscriptionAttributes",
              "sns:GetTopicAttributes",
              "sns:ListSubscriptions",
              "sns:ListSubscriptionsByTopic",
              "sns:ListTopics",
              "sns:SetSubscriptionAttributes",
              "sns:SetTopicAttributes",
              "sns:Subscribe",
              "sns:Unsubscribe",
              "states:CreateStateMachine",
              "states:DeleteStateMachine"
          ],
          "Effect": "Allow",
          "Resource": "*"
      }
  ],
  "Version": "2012-10-17"
}- Click Next until you see Create user. Then, copy the Access Key ID and Secret access key to somewhere like notepad.
- Enter in the API keys
export AWS_ACCESS_KEY_ID=<your-key-here>
export AWS_SECRET_ACCESS_KEY=<your-secret-key-here>
# AWS_ACCESS_KEY_ID and AWS_SECRET_ACCESS_KEY are now available for serverless to use- Deploy
serverless deployThen you are gonna see
Serverless: Packaging service...
Serverless: Excluding development dependencies...
Serverless: Creating Stack...
Serverless: Checking Stack create progress...
.....
Serverless: Stack create finished...
Serverless: Uploading CloudFormation file to S3...
Serverless: Uploading artifacts...
Serverless: Uploading service aws-python3.zip file to S3 (1.97 KB)...
Serverless: Validating template...
Serverless: Updating Stack...
Serverless: Checking Stack update progress...
...............
Serverless: Stack update finished...
Service Information
service: aws-python3
stage: dev
region: us-east-1
stack: aws-python3-dev
resources: 5
api keys:
  None
endpoints:
  None
functions:
  hello: aws-python3-dev-hello
layers:
None- Add a profile
Yes. Do add a profile so that next time you create a similar kind of project, you will not have to enter in your api keys again.
- install
awscli(if this does not work, use bundle installer. If the install command breaks with an error, perhaps runapt-get installapt-get install python-dev`
pip install awscli --upgrade --userserverless config credentials --provider aws --key 1234 --secret 5678 --profile custom-profile- Later on, you can use this profile in this way:
serverless deploy --aws-profile profileIjustMadeof course you can modify your profile info and api keys in ~/.aws/credentials.
Check your function is working
First, set a function name in serverless.yml:
functions:
  hello:
    handler: handler.hello
    name: hello
Then sls deploy again to make changes.
Now,
$ serverless invoke -f hello
{
    "statusCode": 200,
    "body": "{\"message\": \"Go Serverless v1.0! Your function executed successfully!\", \"input\": {}}"
}
yes, it works!!
Want to include python modules? Make a deployment package.
A deployment package is a ZIP archive that contains your function code and dependencies.
You need to create a deployment package if you use the Lambda API to manage functions, or if your code uses libraries other than the AWS SDK. Other libraries and dependencies need to be included in the deployment package. You can upload the package directly to Lambda, or you can use an Amazon S3 bucket, and then upload it to Lambda.
-
First, you would need to have aws cli installed. If you have not, check above for steps.
-
Then install dependencies to a local directory with pip, and include them in your deployment package.
j031:~/workspace (master) $ mkdir packages
j031:~/workspace (master) $ cd packages/
j031:~/workspace/packages (master) $ ls
j031:~/workspace/packages (master) $ pip install requests --target .- Create zip of packages
$ zip -r9 ../function.zip .- Add function code to the zip
j031:~/workspace/es (master) $ zip -g function.zip handler.py
adding: handler.py (deflated 50%)- Upload!
j031:~/workspace/es (master) $ aws lambda update-function-code --function-name crawler --zip-file fileb://function.zip- If you feel tiredsome, just create
update.sh:
mkdir .tmp
zip -r9 ./.tmp/function.zip ./packages
zip -g ./.tmp/function.zip handler.py
aws lambda update-function-code --function-name crawler --zip-file fileb://./.tmp/function.zip
rm -rf ./.tmp
OR use serverless-python-requirements
Just install it, and produce requirements.txt by running pip freeze > requirements.txt and run sls deploy.
I find this way very much simpler and easier!
Source code
The source code can be found from this repo!
serverless.yml
In the name and other relevant fields, fill out suitable values.
service: crawl-service # NOTE: update this with your service name

...

provider:
  name: aws
  runtime: python3.6
  region: us-east-1

...

functions:
  crawler:
    handler: handler.crawler # # The file and module for this specific function.
    name: crawler

    ...